In the current version such scenes and scenarios are available:
| bundle | name | scene | scenario |
|---|---|---|---|
| FLS | Peg Transfer | FLS_PegTransfer | PegTransfer |
| FLS | Circle Cutting | FLS_CircleCutting | CircleCutting |
| FLS | Intracorporeal Suture | FLS_IntracorporealSuture | Experimental |
| FRS | Puzzle Piece Dissection | FRS_PuzzlePieceDissection | PuzzlePieceDissection |
| FRS | Vessel Energy Dissection | FRS_VesselEnergyDissection | VesselEnergyDissection |
| FRS | Fourth Arm Cutting | FRS_FourthArmCutting | FourthArmCutting |
| FRS | Ring Tower Transfer | FRS_RingTowerTransfer | |
| FRS | Knot Tying | FRS_KnotTying | Experimental |
| FRS | Railroad Track Suturing | FRS_RailroadTrack | Experimental |
| Cholecystectomy | Critical View of Safety | Cholecystectomy | Dissecting |
| Cholecystectomy | Clipping and division | Cholecystectomy | Clipping |
| Cholecystectomy | Gallbladder separation | Cholecystectomy | Separation |
| Cholecystectomy | Free-form | Cholecystectomy | Full |
| Total hysterectomy | Ligament transection | Gynecology | TCuttingLigaments |
| Total hysterectomy | Bladder mobilization | Gynecology | TBladderMobilization |
| Total hysterectomy | Colpotomy | Gynecology | TColpotomy |
| Total hysterectomy | Free-form | Gynecology | TFull |
| Total hysterectomy with salpingo-oopherectomy | Ligament transection | Gynecology | RCuttingLigaments |
| Total hysterectomy with salpingo-oopherectomy | Bladder mobilization | Gynecology | RBladderMobilization |
| Total hysterectomy with salpingo-oopherectomy | Colpotomy | Gynecology | RColpotomy |
| Total hysterectomy with salpingo-oopherectomy | Free-form | Gynecology | RFull |
| Supracervical hysterectomy | Ligament transection | Gynecology | SCuttingLigaments |
| Supracervical hysterectomy | Transection of the uterine body | Gynecology | SRemoval |
| Supracervical hysterectomy | Free-form | Gynecology | SFull |
| Prostatectomy | Separation of the prostate from the bladder | Prostatectomy | SeparateProstateFromBladder |
| Prostatectomy | Dissection of seminal vesicles | Prostatectomy | PreparationOfSeminalVessicles |
| Prostatectomy | Prostatectomy: Free-form | Prostatectomy | Full |
| Hemicolectomy | Colic vessels dissection | Hemicolectomy | Vessel_Clipping |
| Hemicolectomy | Colon mobilization and cutting | Hemicolectomy | Colon_Mobilization |
| Hemicolectomy | Right hemicolectomy | Hemicolectomy | Full |
| Nissen Fundoplication | Dissection of esophageal hiatus area | Nissen | Dissection |
| Nissen Fundoplication | Esophageal hernia repair | Nissen | HerniaRepair |
| Nissen Fundoplication | Free-form | Nissen | Full |
| Pyeloplasty | Colon dissection | LeftKidney | Pyeloplasty_Mobilization |
| Pyeloplasty | Ureter and vessles dissection | LeftKidney | Pyeloplasty_Dissection |
| Pyeloplasty | Free-form | LeftKidney | Pyeloplasty_Full |
| Pyeloplasty Pediatric | Dissection | Pyeloplasty Pediatric | Dissection |
| Pyeloplasty Pediatric | Cutting | Pyeloplasty Pediatric | Cutting |
| Pyeloplasty Pediatric | Cutting with suspension | Pyeloplasty Pediatric | Cutting with suspension |
| Pyeloplasty Pediatric | Free-form | Pyeloplasty Pediatric | FreeForm |
FLS: Peg Transfer

Description
The scene is a virtual version of the original FLS: Peg Transfer task. In this task, six triangular objects are placed on six pegs located on the left side of the board. The objective is for the trainee to grasp each object with the left hand, transfer it mid-air to the right hand, and place it on a peg on the opposite side of the board. There is no required sequence for transferring the triangles, and the transfer of each object must occur mid-air without using the board or pegs for assistance. Once all six triangles have been transferred to the right side, the process is reversed, transferring the triangles back to the left side in the same manner.
During the task, the trainee should aim to avoid dropping the triangles. If a triangle is dropped but remains within the field of view and is retrievable, the task may continue with an attempt to pick up the dropped object using the same hand it was dropped with. The drop cannot serve as the transfer point. If retrieval is not possible, the trainee should proceed with the remaining triangles and continue the task without interruption.
Instruments
List of instruments recommended for this scenario. You may use alternative instruments with equivalent functionality, including those sideloaded from an AssetBundle, as long as they support the same actions.
- robotic_grasper_5mm
- robotic_grasper_5mm
Video
FLS: Circle Cutting
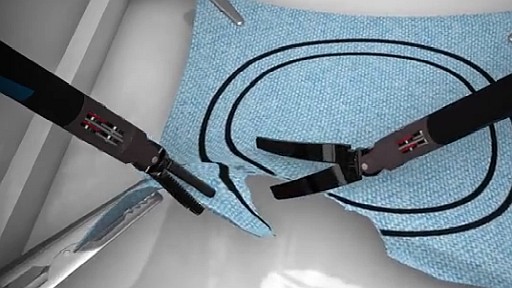
Description
The scene is a virtual version of the original FLS: Circle Cutting task.
In this task, a circular template is printed on a sheet of virtual material, secured in place by four clips at opposite ends. The objective is for the trainee to cut out the circular shape as precisely as possible between the designated lines. Using scissors in one hand and grasper in other hand, the trainee must stabilize the material with the grasper while carefully cutting along the circular line with the scissors.
The task requires smooth, deliberate movements to maintain accuracy along the circular path. The trainee should aim to avoid tearing the material, cutting outside the line, or leaving gaps along the cut edge. Both tools must work in coordination, with the grasper consistently repositioning to stabilize the material near the cutting point.
Instruments
List of instruments recommended for this scenario. You may use alternative instruments with equivalent functionality, including those sideloaded from an AssetBundle, as long as they support the same actions.
- robotic_grasper_5mm
- robotic_scissors_5mm
Video
FLS: Intracorporeal Suture
Description
The scene is a virtual version of the original FLS: Intracorporeal Suture task.
In this task, a simulated tissue pad is presented with a predefined incision site. The objective is for the trainee to place a precise suture through both edges of the incision and tie a secure intracorporeal knot. Using a graspers in both hands, the trainee must first grasp and correctly orient the needle, then drive it through both sides of the incision. After successful suture placement, the trainee proceeds to tie a secure square knot using intracorporeal technique. The task demands careful control of needle angles, depth, wrist articulation, and dexterity to ensure smooth passage through the tissue and accurate suture placement without causing trauma or misalignment.
Instruments
List of instruments recommended for this scenario. You may use alternative instruments with equivalent functionality, including those sideloaded from an AssetBundle, as long as they support the same actions.
- robotic_grasper_5mm
- robotic_grasper_5mm
Video
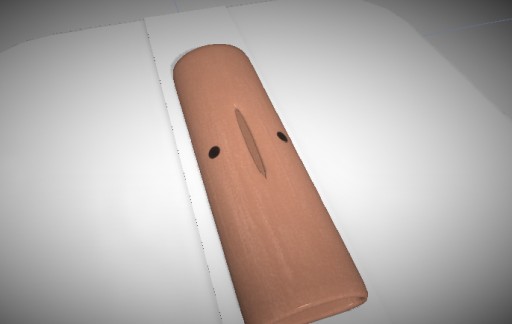
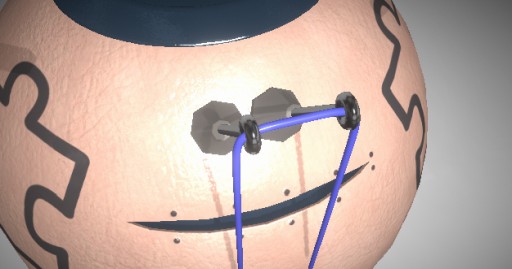
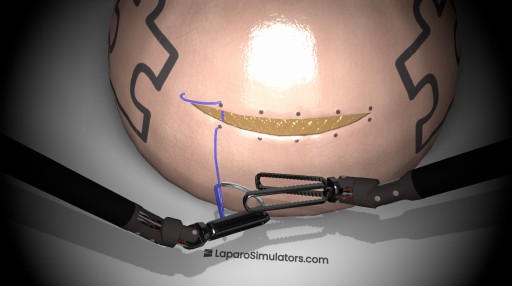
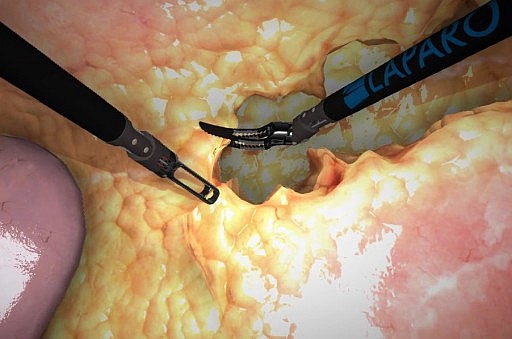
FRS: Puzzle Piece Dissection
Description
The scene is a virtual version of the FRS: Puzzle Piece Dissection task. In this task, a puzzle piece shape is outlined on a simulated FRS dome. The objective is for the trainee to carefully excise the puzzle piece by cutting along the designated boundary using scissors, while using graspers to hold and stabilize the material.
The trainee must follow the outline with precision, avoiding deviations from the boundary and minimizing any damage to the puzzle piece or surrounding material. Stability and control are crucial, requiring the grasper to be strategically repositioned to maintain tension near the cutting point while ensuring clean, continuous cuts.
Instruments
List of instruments recommended for this scenario. You may use alternative instruments with equivalent functionality, including those sideloaded from an AssetBundle, as long as they support the same actions.
- robotic_grasper_5mm
- robotic_scissors_5mm
Video
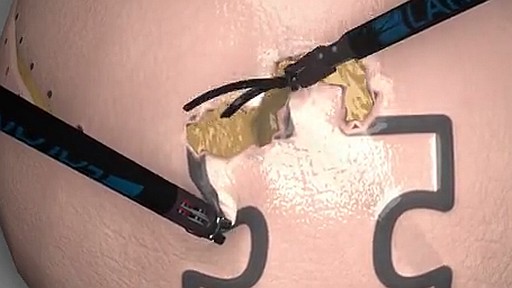
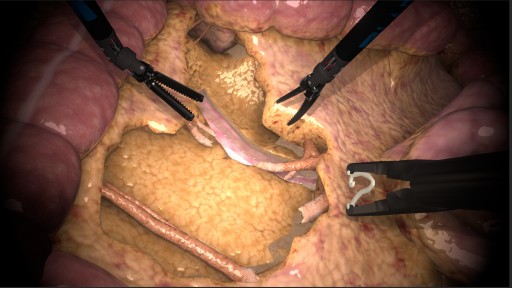
FRS: Vessel Energy Dissection

Description
The scene is a virtual version of the FRS: Vessel Energy Dissection task.
In this task, a simulated vessel is surrounded by soft tissue. The objective is for the trainee to first isolate the vessel by carefully dissecting the surrounding tissue using grasper and scissors. After the vessel is fully exposed, the trainee must then use the energy tool to coagulate both ends of the vessel, ensuring hemostasis. Finally, the vessel should be cut with scissors.
Instruments
List of instruments recommended for this scenario. You may use alternative instruments with equivalent functionality, including those sideloaded from an AssetBundle, as long as they support the same actions.
- robotic_bipolar_forceps_5mm
- robotic_scissors_5mm
Video
FRS: Fourth Arm Cutting
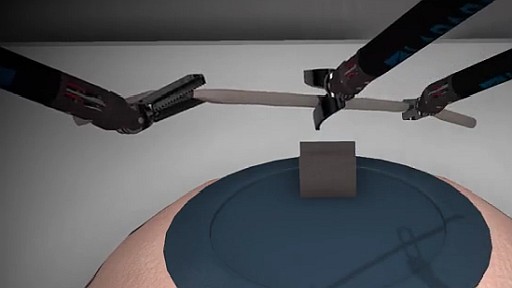
Description
The scene is a virtual version of the FRS: Fourth Arm Cutting task. In this task, the trainee must use two graspers to firmly hold and stabilize a tube in place. Once the tube is securely held, the trainee must switch to control the fourth arm, equipped with scissors, to cut the tube in the marked position. After the cut is made, the separated piece should be placed in a blue area on top of the dome. This sequence must be repeated until all marked locations are cut and the pieces are placed in the correct area.
The trainee must ensure a steady grip with both graspers while carefully repositioning the fourth arm to achieve the precise cutting position. The challenge is to maintain control of both the graspers and the scissors, coordinating the movements to ensure a clean, accurate cuts in all marked positions.
Instruments
List of instruments recommended for this scenario. You may use alternative instruments with equivalent functionality, including those sideloaded from an AssetBundle, as long as they support the same actions.
- robotic_grasper_5mm
- robotic_grasper_5mm
- robotic_scissors_5mm
Video
FRS: Ring Tower Transfer
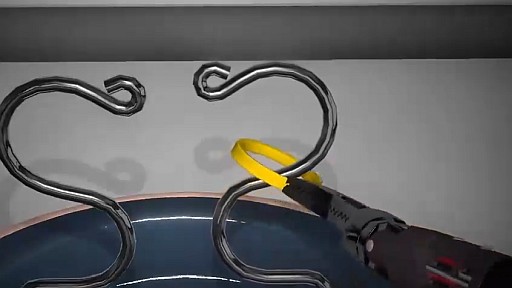
Description
The scene is a virtual version of the FRS: Ring Transfer task.
In this task, two rings are placed on an S-wire within the simulated FRS dome. The trainee must: 1. Pick up and remove a ring from the middle S-wire with one hand without touching the wire. 1. Transfer the ring to the opposite hand in mid-air. 1. Place the ring on the side S-wire without touching the wire.
Instruments
List of instruments recommended for this scenario. You may use alternative instruments with equivalent functionality, including those sideloaded from an AssetBundle, as long as they support the same actions.
- robotic_grasper_5mm
- robotic_grasper_5mm
Video
FRS: Knot Tying
Description
The scene is a virtual version of the FRS: Knot Tying task.
In this task, a piece of simulated suture is presented within the FRS dome. The trainee must use both instruments to tie a secure surgical knot using standard technique, ensuring appropriate tension and avoiding tangling.
Instruments
List of instruments recommended for this scenario. You may use alternative instruments with equivalent functionality, including those sideloaded from an AssetBundle, as long as they support the same actions.
- robotic_grasper_5mm
- robotic_grasper_5mm
Video
FRS: Railroad Track Suturing
Description
The scene is a virtual version of the original FRS: Railroad Track Suturing task.
In this task, two tissue edges are presented along a straight incision line, with predefined targets marking the suture entry and exit points. The objective is for the trainee to place a series of evenly spaced stitches across the incision, resulting in a continuous �railroad track� pattern that aligns the tissue edges precisely.
Instruments
List of instruments recommended for this scenario. You may use alternative instruments with equivalent functionality, including those sideloaded from an AssetBundle, as long as they support the same actions.
- robotic_grasper_5mm
- robotic_grasper_5mm
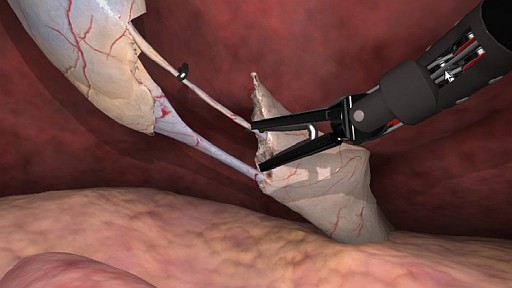
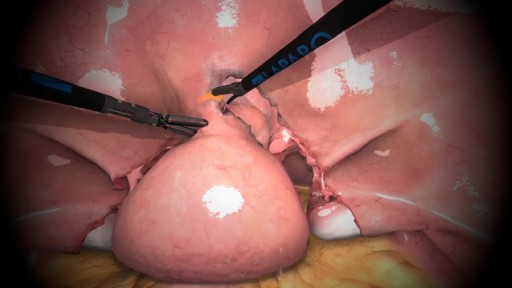
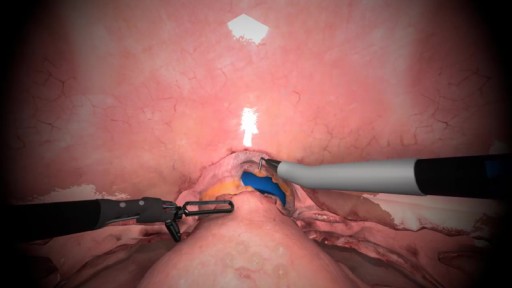
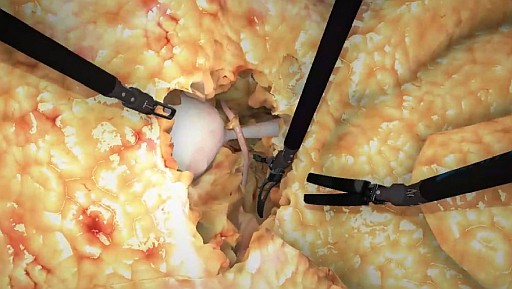
Cholecystectomy: Critical View of Safety
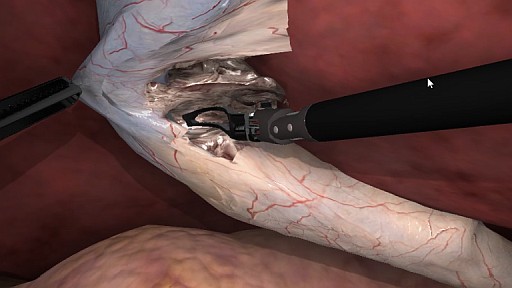
Description
Introduced in response to an increase in biliary injuries, CVS relies on three criteria. Firstly, only two structures should be clearly connected to the gallbladder. Secondly, the lower 1/3 of the gallbladder is separated from the liver, exposing the cystic plate. Thirdly, the hepatocystic triangle must be completely free of tissue for proper visibility of all cystic structures. Assessment of these criteria is imperative before applying any clips.
You must first grasp the base of the gallbladder and then use the dissector to dissect the tissue in the Calot's triangle. The objective is to properly expose the cystic duct and the artery which are concealed beneath the surface of the surrounding tissues. The monopolar hook can also be used to visualize these structures.
Instructions
- Grab the neck of gallbladder with a grasper and pull it laterally.
- Begin the dissection using a dissector from the cystic duct area.
- Continue dissection laterally until about 1/3 of gallbladder is dissected.
- Pull the gallbladder neck to visualize vessels from the other side (CVS).
Instruments
List of instruments recommended for this scenario. You may use alternative instruments with equivalent functionality, including those sideloaded from an AssetBundle, as long as they support the same actions.
- robotic_grasper_5mm
- robotic_bipolar_forceps_5mm
Video
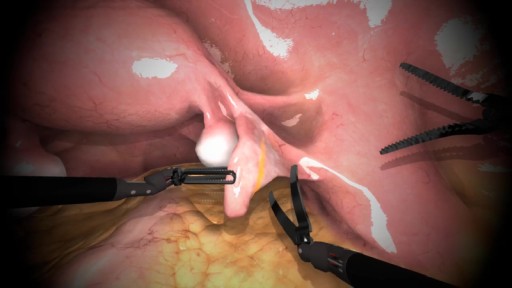
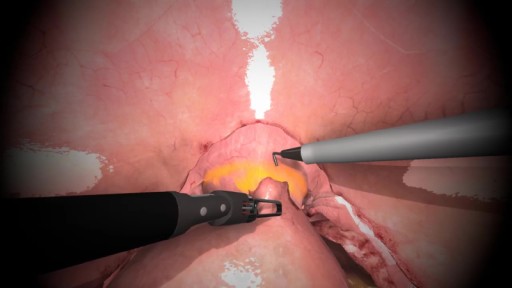
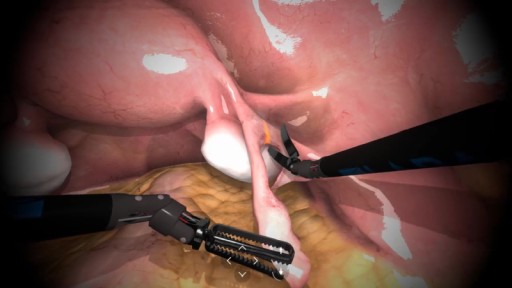
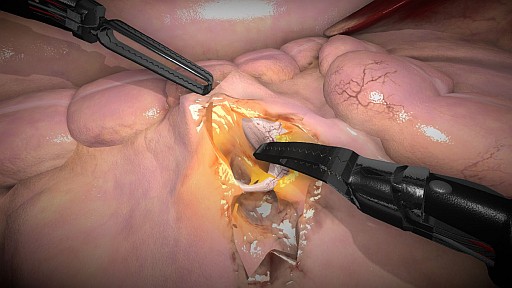
Cholecystectomy: Clipping and division
Description
Next step of the procedure is closing and cutting the cystic duct and artery. Cystic duct should be clipped with 3 clips. 2 clips should be applied proximally on the side of the common bile duct to prevent bile leakage. 1 clip should then be applied distally to prevent the gallbladder from leaking any bile. Views on the number of clips applied to the cystic artery differ. Some consultants use 3 clips, with 2 clips remaining proximally on the cystic artery. Others use only 2 clips, with 1 clip proximally and 1 clip distally. The guided scenario for cholecystectomy clipping features 2 clips on the cystic artery. It is recommended that the cystic artery is clipped and cut first because it is smaller and more delicate than the cystic duct.
Instructions
- Apply two clips proximally on the cystic duct.
- Apply one clip distally on the cystic duct.
- Apply two clips proximally on the cystic artery.
- Apply one clip distally on the cystic artery.
- Cut the cystic duct and artery between proximal and distal clips.
Instruments
List of instruments recommended for this scenario. You may use alternative instruments with equivalent functionality, including those sideloaded from an AssetBundle, as long as they support the same actions.
- robotic_grasper_5mm
- robotic_clip_applier_5mm
- robotic_scissors_5mm
Video
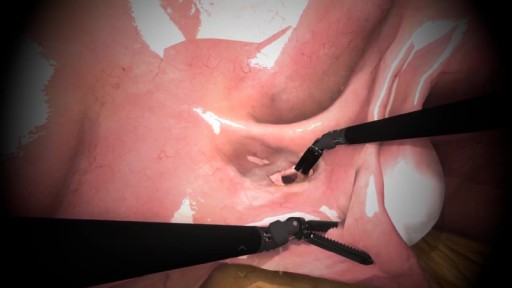
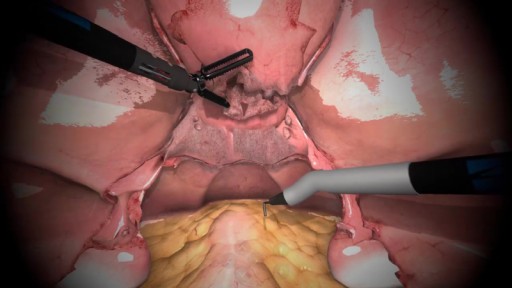
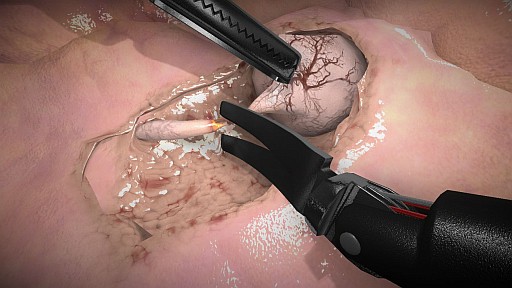
Cholecystectomy: Gallbladder separation
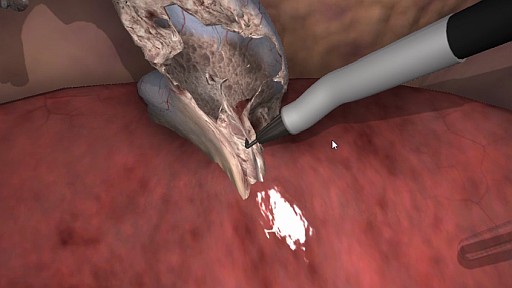
Description
In this guided scenario, the cystic duct and artery have already been clipped and cut. What remains is the separation of the gallbladder from the liver along the cystic plate.
Separation of the gallbladder from the cystic plate is done with a hook connected to monopolar energy. The idea is to use the grasper on the base of the gallbladder and to create tension force at the cystic plate. The monopolar hook should be used to �hook� just a small piece of the tissue halfway between the cystic plate and the gallbladder. After briefly pausing to confirm that the hook did not capture other tissues, monopolar energy can be used to �cook� the tissue. The movement is then performed repeatedly. The gallbladder should gradually become separated from the cystic plate.
Instructions
- Grab the gallbladder and pull it laterally.
- Begin dissection with the hook starting from medial area.
- Continue dissection laterally.
- When the gallbladder is completely separated from the liver, extract it through the trocar.
Instruments
List of instruments recommended for this scenario. You may use alternative instruments with equivalent functionality, including those sideloaded from an AssetBundle, as long as they support the same actions.
- robotic_grasper_5mm
- robotic_hook_5mm
Video
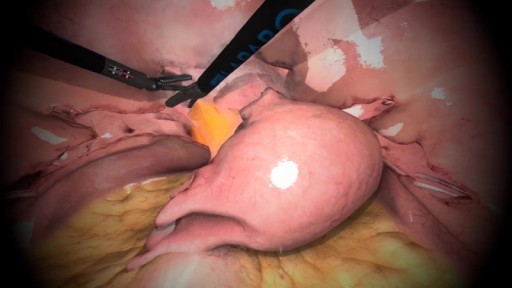
Cholecystectomy: Free-form
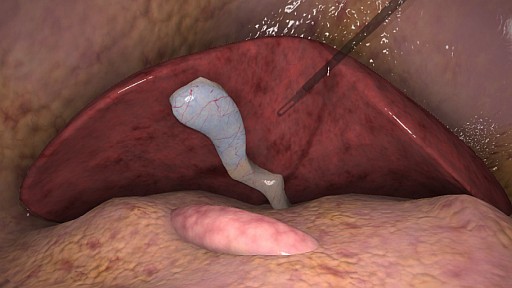
Description
In this virtual exercise the objective is to perform an entire cholecystectomy without any guidance.
The exercise begins with the gallbladder laid out on the surface of the liver and the exercise concludes with the removal of the gallbladder from the operating area.
Instructions
The trainee must first grasp the base of the gallbladder and then use the dissector to dissect the tissue in the Calot's triangle. The objective is to properly expose the cystic duct and the artery which are concealed beneath the surface of the surrounding tissues. The monopolar hook can be used to visualize these structures. Upon properly identifying and assessing these structures the trainee must insert the clip applier and apply clips to the duct and artery. Theoretically 3 clips should be used on the cystic duct and 2 clips on the cystic artery. When these structures are cut in this way, there is a limited danger of bleeding or bile leaking. Finally, the trainee must accurately separate the gallbladder with the monopolar hook from liver surface before removal.
Instruments
List of instruments recommended for this scenario. You may use alternative instruments with equivalent functionality, including those sideloaded from an AssetBundle, as long as they support the same actions.
- robotic_grasper_5mm
- robotic_bipolar_forceps_5mm
- robotic_clip_applier_5mm
- robotic_scissors_5mm
- robotic_hook_5mm
Total hysterectomy: Ligament transection
Description
The first stage of total hysterectomy focuses on the precise coagulation and division of the round, broad, ovarian ligaments, and fallopian tubes. The process begins with identifying key anatomical structures, such as the ureters, uterine arteries, and ovarian suspensory ligaments, aiming to remove these tissues while ensuring safety and minimizing the risk of damage to surrounding structures.
Instructions
- Identify and coagulate fragments of mesosalpinx, ensuring protection of adjacent structures, including the ureter.
- Transect the coagulated portion of the fimbrial end along its course.
- Coagulate and transect the uterine ostium of the fallopian tube, ensuring effective hemostasis.
- Coagulate and transect the proper ovarian ligament, detaching the adnexa from the uterus.
- Coagulate and transect the round ligament of the uterus.
- Coagulate and transect the right ovarian artery and vein, maintaining strict hemostatic control.
- Separate the upper and lower leaf of the broad ligament by dissecting the loose connective tissue using the stripping technique.
- Coagulate and transect the lower and upper leaf of the broad ligament sequentially.
- Repeat the same steps on the left side, beginning with coagulation and transection of the mesosalpinx, followed by the uterine ostium of the tube, the proper ovarian ligament, the round ligament of the uterus, and the ovarian vessels, completing the procedure with dissection of the broad ligament using the stripping technique.
Instruments
List of instruments recommended for this scenario. You may use alternative instruments with equivalent functionality, including those sideloaded from an AssetBundle, as long as they support the same actions.
- robotic_grasper_5mm
- robotic_bipolar_forceps_5mm
- robotic_scissors_5mm
Video
Total hysterectomy: Bladder mobilization
Description
In this stage, after preparing the tissues around the uterus, the focus shifts to mobilizing the bladder. It begins with a careful dissection and coagulation of the bladder ligaments. The aim is to detach the bladder from the anterior uterine wall, improving visibility and providing better access for further steps. Caution is essential in this phase to avoid bladder damage and injury to adjacent structures.
Instructions
- Identify the vesicouterine pouch and begin dissection by carefully incising the peritoneum.
- Gradually mobilize the bladder, separating it from the anterior uterine wall. Continue the dissection, gently separating tissues while minimizing vascular damage and reducing the risk of bleeding.
- Dissect the loose connective tissue, progressively exposing the left uterine artery and vein while maintaining caution near the ureter.
- Coagulate and transect the left uterine artery and vein, ensuring effective hemostasis before proceeding.
- Repeat the dissection on the right side, exposing the right uterine artery and vein.
- Coagulate and transect the right uterine vessels, completely detaching the uterus from its anterior vascular and connective attachments.
- Ensure that the bladder is adequately mobilized, allowing safe uterine separation and transition to the next step of the procedure.
Notes - In patients with a history of previous cesarean section, this area may be scarred, so try to perform the dissection relatively high on the uterus. - If you encounter fatty tissue, reconsider the direction of the dissection, as the fat belongs to the bladder, which may indicate that the dissection has come too close to the bladder.
Instruments
List of instruments recommended for this scenario. You may use alternative instruments with equivalent functionality, including those sideloaded from an AssetBundle, as long as they support the same actions.
- robotic_grasper_5mm
- robotic_harmonic_scalpel_5mm
Video
Total hysterectomy: Colpotomy
Description
The final stage of total hysterectomy involves performing colpotomy and removing the uterus. In this stage, using the uterine manipulator, the cervix is excised with precise technique, allowing for the safe removal of the entire uterus. Colpotomy is performed using an appropriate energy source. After the uterus is removed, sutures are placed on the vaginal vault, and hemostasis is checked.
Instructions
- Use the uterine manipulator to elevate the uterus and clearly expose the vaginal vault.
- Locate the indentation of the colpotomy cup on the vaginal vault.
- Perform precise circumferential dissection of the tissues around the colpotomy cup using an appropriate energy source (e.g., a harmonic scalpel).
- Carefully incise the tissues to create an opening in the vaginal vault, ensuring that you avoid damaging the colpotomy cup or other anatomical structures.
- Verify that the incision is evenly made and that the uterus is fully separated from the vaginal vault.
Instruments
List of instruments recommended for this scenario. You may use alternative instruments with equivalent functionality, including those sideloaded from an AssetBundle, as long as they support the same actions.
- robotic_grasper_5mm
- robotic_hook_5mm
Video
Total hysterectomy: Free-form

Description
In this scenario, you have the opportunity to independently perform total hysterectomy according to your preferences. Unlike exercises with predefined scenarios, this task gives you freedom of action while still requiring you to utilize your existing knowledge and skills. You must demonstrate precision and confidence in carrying out this procedure.
Instructions
This scenario does not come with an instructional video. Perform total hysterectomy at your discretion: either by repeating the technique learned in previous scenarios with instructions, or by using another technique known to you.
The greatest educational value lies in practicing with assistance. By practicing in groups of 2 or 3, you can assign roles to each other (operator, assistant, scrub nurse) and practice communication.
Instruments
List of instruments recommended for this scenario. You may use alternative instruments with equivalent functionality, including those sideloaded from an AssetBundle, as long as they support the same actions.
- robotic_grasper_5mm
- robotic_hook_5mm
- robotic_bipolar_forceps_5mm
- robotic_harmonic_scalpel_5mm
- robotic_scissors_5mm
Total hysterectomy with salpingo-oopherectomy: Ligament transection
Description
The first step of this procedure is the precise identification of key anatomical structures, including the ureters, uterine arteries, and the infundibulopelvic ligaments (suspensory ligaments of the ovaries). Next, perform coagulation and transection of the round ligaments and broad ligaments, ensuring effective hemostasis and preparing the surgical field for further dissection. After securing the uterine vessels and transecting the infundibulopelvic ligaments, completely mobilize the uterus along with the adnexa. These prepared structures will allow you to safely proceed to the next stage of the operation.
Instructions
- Identify the left ureter, ensuring it is safely positioned outside the dissection field.
- Locate and dissect the infundibulopelvic ligament, carefully exposing the ovarian vessels.
- Coagulate and transect the avascular triangle of the broad ligament to gain access to vascular structures.
- Coagulate and transect the round ligament while maintaining hemostasis.
- Dissect the loose connective tissue between the layers of the round ligament using the stripping technique.
- Sequentially transect the upper and lower layers of the round ligament.
- Repeat the same steps on the right side.
Instruments
List of instruments recommended for this scenario. You may use alternative instruments with equivalent functionality, including those sideloaded from an AssetBundle, as long as they support the same actions.
- robotic_grasper_5mm
- robotic_scissors_5mm
- robotic_bipolar_forceps_5mm
Video
Total hysterectomy with salpingo-oopherectomy: Bladder mobilization
Description
In this stage, after preparing the tissues around the uterus, the focus shifts to mobilizing the bladder. It begins with a careful dissection and coagulation of the bladder ligaments. The aim is to detach the bladder from the anterior uterine wall, improving visibility and providing better access for further steps. Caution is essential in this phase to avoid bladder damage and injury to adjacent structures.
Instructions
- Identify the vesicouterine pouch and begin dissection by carefully incising the peritoneum.
- Gradually mobilize the bladder, separating it from the anterior uterine wall. Continue the dissection, gently separating tissues while minimizing vascular damage and reducing the risk of bleeding.
- Dissect the loose connective tissue, progressively exposing the left uterine artery and vein while maintaining caution near the ureter.
- Coagulate and transect the left uterine artery and vein, ensuring effective hemostasis before proceeding.
- Repeat the dissection on the right side, exposing the right uterine artery and vein.
- Coagulate and transect the right uterine vessels, completely detaching the uterus from its anterior vascular and connective attachments.
- Ensure that the bladder is adequately mobilized, allowing safe uterine separation and transition to the next step of the procedure.
Notes: - In patients with a history of previous cesarean section, this area may be scarred, so try to perform the dissection relatively high on the uterus. - If you encounter fatty tissue, reconsider the direction of the dissection, as the fat belongs to the bladder, which may indicate that the dissection has come too close to the bladder.
Instruments
List of instruments recommended for this scenario. You may use alternative instruments with equivalent functionality, including those sideloaded from an AssetBundle, as long as they support the same actions.
- robotic_grasper_5mm
- robotic_harmonic_scalpel_5mm
Video
Total hysterectomy with salpingo-oopherectomy: Colpotomy
Description
The final stage of radical hysterectomy involves performing colpotomy and removing the uterus. In this stage, using the uterine manipulator, the cervix is excised with precise technique, allowing for the safe removal of the entire uterus. Colpotomy is performed using an appropriate energy source. After the uterus is removed, sutures are placed on the vaginal vault, and hemostasis is checked
Instructions
- Use the uterine manipulator to elevate the uterus and clearly expose the vaginal vault.
- Locate the indentation of the colpotomy cup on the vaginal vault.
- Perform precise circumferential dissection of the tissues around the colpotomy cup using an appropriate energy source (e.g., a harmonic scalpel).
- Carefully incise the tissues to create an opening in the vaginal vault, ensuring that you avoid damaging the colpotomy cup or other anatomical structures.
- Verify that the incision is evenly made and that the uterus is fully separated from the vaginal vault.
Instruments
List of instruments recommended for this scenario. You may use alternative instruments with equivalent functionality, including those sideloaded from an AssetBundle, as long as they support the same actions.
- robotic_grasper_5mm
- robotic_hook_5mm
Video
Total hysterectomy with salpingo-oopherectomy: Free-form
Description
In this scenario, you have the opportunity to independently perform total hysterectomy with salpingo-oopherectomy according to your preferences. Unlike exercises with predefined scenarios, this task gives you freedom of action while still requiring you to utilize your existing knowledge and skills. You must demonstrate precision and confidence in carrying out this procedure.
Instructions
This scenario does not come with an instructional video. Perform total hysterectomy with salpingo-oopherectomy at your discretion: either by repeating the technique learned in previous scenarios with instructions, or by using another technique known to you.
The greatest educational value lies in practicing with assistance. By practicing in groups of 2 or 3, you can assign roles to each other (operator, assistant, scrub nurse) and practice communication.
Instruments
List of instruments recommended for this scenario. You may use alternative instruments with equivalent functionality, including those sideloaded from an AssetBundle, as long as they support the same actions.
- robotic_grasper_5mm
- robotic_hook_5mm
- robotic_bipolar_forceps_5mm
- robotic_harmonic_scalpel_5mm
- robotic_scissors_5mm
Supracervical hysterectomy: Ligament transection
Description
The goal of this training is to master the key steps of a supracervical hysterectomy, which is divided into two main stages: ligation of the ligaments and resection of the uterine body at the isthmus level. Initially, you will focus on coagulation and division of the round ligaments, ovarian ligaments, and fallopian tubes. Next, you will practice identification, dissection, and coagulation of the uterine vessels, ensuring precise execution of the procedure in clinical practice.
Instructions
- Identify the right ureter and trace its course.
- Coagulate and transect the mesosalpinx along with its uterine ostium, ensuring effective hemostasis.
- Coagulate and transect the proper ovarian ligament, detaching the adnexa from the uterus.
- Coagulate and transect the round ligament of the uterus to facilitate further uterine mobilization.
- Dissect the loose connective tissue, separating the upper and lower leaves of the round ligament using the stripping technique.
- Coagulate and transect the lower and upper leaves of the round ligament sequentially.
- Dissect, coagulate, and transect the right uterine artery and vein.
- Repeat the same steps on the opposite side, starting with ureter identification, followed by coagulation and transection of the mesosalpinx, its uterine ostium, the proper ovarian ligament, the round ligament of the uterus, and the uterine vessels, concluding with the dissection of the round ligament leaves using the stripping technique.
Instruments
List of instruments recommended for this scenario. You may use alternative instruments with equivalent functionality, including those sideloaded from an AssetBundle, as long as they support the same actions.
- robotic_grasper_5mm
- robotic_bipolar_forceps_5mm
- robotic_scissors_5mm
Video
Supracervical hysterectomy: Transection of the uterine body
Description
The second stage of subtotal hysterectomy involves resection of the uterine corpus at the isthmus level and hemostasis of the cervical stump. The training focuses on mastering precise surgical techniques while emphasizing safety and procedural efficiency.
Instructions
- Coagulate the bladder peritoneum, undermine it, and open it.
- Transect the uterine corpus at the isthmus level.
- Perform hemostasis of the cervical stump.
Instruments
List of instruments recommended for this scenario. You may use alternative instruments with equivalent functionality, including those sideloaded from an AssetBundle, as long as they support the same actions.
- robotic_grasper_5mm
- robotic_hook_5mm
Video
Supracervical hysterectomy: Free-form

Description
In this scenario, you have the opportunity to independently perform supracervical hysterectomy according to your preferences. Unlike exercises with predefined scenarios, this task gives you freedom of action while still requiring you to utilize your existing knowledge and skills. You must demonstrate precision and confidence in carrying out this procedure.
Instructions
This scenario does not come with an instructional video. Perform supracervical hysterectomy at your discretion: either by repeating the technique learned in previous scenarios with instructions, or by using another technique known to you.
The greatest educational value lies in practicing with assistance. By practicing in groups of 2 or 3, you can assign roles to each other (operator, assistant, scrub nurse) and practice communication.
Instruments
List of instruments recommended for this scenario. You may use alternative instruments with equivalent functionality, including those sideloaded from an AssetBundle, as long as they support the same actions.
- robotic_grasper_5mm
- robotic_hook_5mm
- robotic_bipolar_forceps_5mm
- robotic_harmonic_scalpel_5mm
- robotic_scissors_5mm
Prostatectomy: Separation of the prostate from the bladder
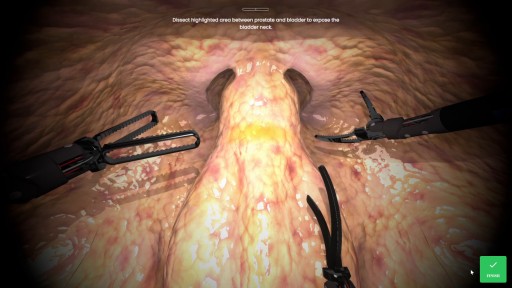
Description
In the first stage you must dissect the layer of tissue which covers the connection between the prostate and the bladder. This layer makes it difficult to accurately define the exact location of the connection and there are two ways you can define it.
Method presented in the virtual scenario is done by applying an instrument to the surface of this connection. The prostate has more stiffness to it, and the bladder is softer and more malleable. When this connection is defined, you must dissect that area to visualize the exact location of the connection between these two organs. This is often the most time consuming stage of the procedure.
(The other way to perform this stage is by using a balloon-tip catheter. After inserting this catheter up to the bladder, the balloon is inflated and when the catheter is pulled, the balloon stops at the appropriate location and you can approximately find the bladder position based on the movements.)
First you must cut this connection proximally, and then gradually to the bottom. Before separating the connection completely it is necessary to find and visualize the vas deferens and the seminal vesicles which are located directly below the prostate. Dissect the highlighted area using scissors as instructed until the blue catheter is accessible.
Instructions
- Dissect the connective tissue between bladder and prostate.
- Cut the bladder neck close to the prostate.
Instruments
List of instruments recommended for this scenario. You may use alternative instruments with equivalent functionality, including those sideloaded from an AssetBundle, as long as they support the same actions.
- robotic_grasper_5mm
- robotic_dissector_5mm
- robotic_scissors_5mm
Video
Prostatectomy: Dissection of seminal vesicles
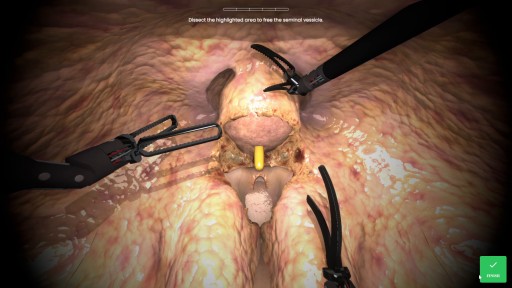
Description
The seminal vesicles are connected to the prostate itself and after visualizing and dissecting it should be left attached to the prostate. The vas deferens on the other hand lead to the testicles and should be cut. At this point, the remaining tissues connecting the bladder and the urethra can be cut.
Instructions
- Dissect the seminal vesicles.
- Cut the vasa deferentia.
- Dissect the remaining tissues around the prostate.
Instruments
List of instruments recommended for this scenario. You may use alternative instruments with equivalent functionality, including those sideloaded from an AssetBundle, as long as they support the same actions.
- robotic_grasper_5mm
- robotic_dissector_5mm
- robotic_scissors_5mm
Video
Prostatectomy: Prostatectomy: Free-form
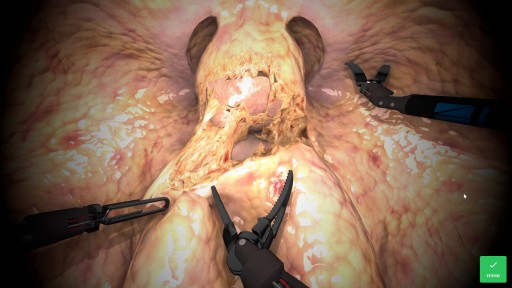
Description
This scenario allows trainees to perform certain stages of prostatectomy procedure on their own beginning with prostate dissection through seminal vesicles dissection until excision of the whole prostate specimen - the simulation starts with the entrance of laparoscopic camera into the operating area.
Instructions
This scenario does not come with an instructional video. Perform prostatectomy at your discretion: either by repeating the technique learned in previous scenarios with instructions, or by using another technique known to you.
The greatest educational value lies in practicing with assistance. By practicing in groups of 2 or 3, you can assign roles to each other (operator, assistant, scrub nurse) and practice communication.
Instruments
List of instruments recommended for this scenario. You may use alternative instruments with equivalent functionality, including those sideloaded from an AssetBundle, as long as they support the same actions.
- robotic_grasper_5mm
- robotic_dissector_5mm
- robotic_scissors_5mm
Hemicolectomy: Colic vessels dissection
Description
This scenario shows the first stage of the procedure. Simulation allows trainee to trace the course of surgery and enhance their knowledge about anatomy of vascular system of this area. Training enhances the precision of dissection skills and allows recognition of potential sources of complications. To begin with trainee should identify mesentery of ileocaecal region and visualize ileocolic vessels - during dissection of mesentery proper margin of mesentery must be maintained in order to excise all possible metastatic cells in nodes. Stretching the mesentery will be helpful in finding the location of these vessels - vessels should form an inverted L-shape. Vessels should be dissected and coagulated proximally to superior mesenteric vessels, then dissection should be continued along SMA until the visualization of right colic vessels (which are present in ~20% of patients as separate branches of SMA) around duodenal region.
Instructions
- Identify ileocolic vessels.
- Dissect ileocolic vessels.
- Clip and cut skeletonized vessels proximally to the SMA trunk.
- Continue dissection in cephalad direction.
- Identify and dissect right colic vessels.
- Clip and cut right colic vessels.
Instruments
List of instruments recommended for this scenario. You may use alternative instruments with equivalent functionality, including those sideloaded from an AssetBundle, as long as they support the same actions.
- robotic_grasper_5mm
- harmonic_scalpel_5mm
- robotic_scissors_5mm
- hemolok_10mm
Video
Hemicolectomy: Colon mobilization and cutting
Description
Next stage of procedure is dissection along the line of Toldt starting from caecal region in order to mobilize affected colon using a harmonic scalpel all the way to hepatic flexure of colon. During this stage keep special caution due to close location of ureter and gonadal vessels. Continue dissecting major omentum from transverse colon around hepatic flexure and cut hepatocolic ligament. When dissected part of colon is fully mobilized it must be cut using stapler - start with cutting the ileum on its colic end, then cut the transverse colon.
Instructions
-
Dissection along line of Toldt in cephalad direction.
-
Dissection of structures surrounding hepatic flexure of colon.
-
Cutting the ileum using stapler.
-
Cutting the transverse colon using stapler.
Instruments
List of instruments recommended for this scenario. You may use alternative instruments with equivalent functionality, including those sideloaded from an AssetBundle, as long as they support the same actions.
- robotic_grasper_5mm
- harmonic_scalpel_5mm
Video
Hemicolectomy: Right hemicolectomy

Description
In this scenario trainee can use all the skills archived in previous steps to perform a full right hemicolectomy procedure on their own. Free form is a type of scenario that lets trainee make their own decisions about how to manage the surgery. It�s the summary of learning process of this course.
Instructions
This scenario does not come with an instructional video. Perform right hemicolectomy at your discretion: either by repeating the technique learned in previous scenarios with instructions, or by using another technique known to you.
The greatest educational value lies in practicing with assistance. By practicing in groups of 2 or 3, you can assign roles to each other (operator, assistant, scrub nurse) and practice communication.
Instruments
List of instruments recommended for this scenario. You may use alternative instruments with equivalent functionality, including those sideloaded from an AssetBundle, as long as they support the same actions.
- robotic_grasper_5mm
- harmonic_scalpel_5mm
- robotic_scissors_5mm
- hemolok_10mm
Nissen Fundoplication: Dissection of esophageal hiatus area
Description
The training goal is to learn the technique of precise identification and preparation of the esophageal hiatus, which is crucial for later defect repair. The procedure starts with meticulous identification of the esophageal hiatus in the diaphragm. Using laparoscopic tools, the tissues around the esophagus should be gently separated to gain access and proper visibility of the anatomical structures. The exercise ends once the esophagus and adjacent structures are safely exposed, minimizing the risk of damage.
Instructions
The exercise begins by inserting a grasper and a harmonic scalpel, which are used to dissect the distal esophagus, the esophageal hiatus in the diaphragm, and the area where the esophagus connects to the stomach.
Instruments
List of instruments recommended for this scenario. You may use alternative instruments with equivalent functionality, including those sideloaded from an AssetBundle, as long as they support the same actions.
- robotic_grasper_5mm
- robotic_bipolar_forceps_5mm
Video
Nissen Fundoplication: Esophageal hernia repair
Description
The training goal is to learn effective methods for repairing a hiatal hernia to prevent gastroesophageal reflux. After gaining appropriate access to the esophageal hiatus, the hernia is identified and reduced by moving its contents back into the abdominal cavity. Next, suturing or stapling techniques are used to reinforce weak points and reduce the size of the hiatus. The procedure focuses on permanently removing the hernia and restoring the normal anatomy of the diaphragm around the esophagus.
Instructions
After gaining access to the diaphragm and the area of the gastroesophageal junction, it is essential to carefully dissect the region and relocate the contents of the hernia back into the abdominal cavity.
Instruments
List of instruments recommended for this scenario. You may use alternative instruments with equivalent functionality, including those sideloaded from an AssetBundle, as long as they support the same actions.
- robotic_grasper_5mm
- robotic_bipolar_forceps_5mm
Video
Nissen Fundoplication: Free-form

Description
The entire procedure focuses on the proper approach to the initial stages of Nissen fundoplication.
Instructions
This scenario does not come with an instructional video. Perform the dissection and esophageal hiatus hernia repair at your discretion: either by repeating the technique learned in previous scenarios with instructions, or by using another technique known to you. The greatest educational value lies in practicing with assistance. By practicing in groups of 2 or 3, you can assign roles to each other (operator, assistant, scrub nurse) and practice communication.
Instruments
List of instruments recommended for this scenario. You may use alternative instruments with equivalent functionality, including those sideloaded from an AssetBundle, as long as they support the same actions.
- robotic_grasper_5mm
- robotic_bipolar_forceps_5mm
- robotic_harmonic_scalpel_5mm
Pyeloplasty: Colon dissection
Description
This scenario allows trainees to expand their knowledge of anatomy of the area that�s necessary to be dissected in order to proceed the pyeloplasty in a transperitoneal approach. Trainees can hone their skills of precise dissection and navigation in the operative field through the steps of pyeloplasty procedure. From organs� identification through Toldt�s line and splenic area dissection ending with colon mobilization trainees enhance their skills of laparoscopic surgery.
Instructions
Dissect Toldt�s line. Dissect the area along the spleen to mobilize the colon. Retract the colon in pelvic direction.
Instruments
List of instruments recommended for this scenario. You may use alternative instruments with equivalent functionality, including those sideloaded from an AssetBundle, as long as they support the same actions.
- robotic_grasper_5mm
- robotic_bipolar_forceps_5mm
Video
Pyeloplasty: Ureter and vessles dissection
Description
This scenario allows trainees to dissect the renal hilum which allows for precise identification of anatomical structures such as ureter and vascular system of the kidney which will allow a safe crossing vessels transposition and renal pelvis reduction. Trainees can hone their skills of precise dissection and navigation in the operative field through the steps of pyeloplasty procedure
Instructions
Dissect the ureter area. Dissect the renal hilum. Cut the ureter. Transpose the crossing vessels under the ureter. Incise the ureter longitudinally.
Instruments
List of instruments recommended for this scenario. You may use alternative instruments with equivalent functionality, including those sideloaded from an AssetBundle, as long as they support the same actions.
- robotic_grasper_5mm
- robotic_bipolar_forceps_5mm
- robotic_scissors_5mm
Video
Pyeloplasty: Free-form
Description
This scenario allows participants to set their own training goals, offering a flexible format that can be adapted to individual needs and experience.
Instructions
This scenario does not come with an instructional video. Perform pyeloplasty at your discretion: either by repeating the technique learned in previous scenarios with instructions, or by using another technique known to you.
Instruments
List of instruments recommended for this scenario. You may use alternative instruments with equivalent functionality, including those sideloaded from an AssetBundle, as long as they support the same actions.
- robotic_grasper_5mm
- robotic_bipolar_forceps_5mm
- robotic_scissors_5mm
Pyeloplasty Pediatric: Dissection
Description
In this stage of the pyeloplasty the objective is to dissect and then accurately identify all target tissue structures.
Instructions
Dissect the surface tissue to find the ureter. Identify the renal pelvis and UPJ obstruction by touching instruments to the indicated organs.
Instruments
List of instruments recommended for this scenario. You may use alternative instruments with equivalent functionality, including those sideloaded from an AssetBundle, as long as they support the same actions.
- robotic_grasper_5mm
- robotic_bipolar_forceps_5mm
Video
Pyeloplasty Pediatric: Cutting
Description
In this version of the pyeloplasty the goal is to separate the ureter from the uretero-pelvic junction and to cut the two structures in preparation for suturing.
Instructions
First separate the ureter from the UPJ. Next, cut the urether longitunally, and finally cut the renal pelvis.
Instruments
List of instruments recommended for this scenario. You may use alternative instruments with equivalent functionality, including those sideloaded from an AssetBundle, as long as they support the same actions.
- robotic_grasper_5mm
- robotic_scissors_5mm
Video
Pyeloplasty Pediatric: Cutting with suspension
Description
In this version of the pyeloplasty the renal pelvis is suspended with an additional piece of suture. The goal is to separate the ureter from the renal pelvis but for both structures to remain attached. In this way it is easier to then perform an anastomosis between the two structures while bypassing the obstruction.
Instructions
First cut the ureter but don't cut it entirely across. Next cut the ureter longitudinally and after that cut the renal pelvis.
Instruments
List of instruments recommended for this scenario. You may use alternative instruments with equivalent functionality, including those sideloaded from an AssetBundle, as long as they support the same actions.
- robotic_grasper_5mm
- robotic_scissors_5mm
Video
Pyeloplasty Pediatric: Free-form
Description
In this procedure the objective is to dissect and incise the stenotic part of the ureter.
Instructions
This scenario does not come with an instructional video. Perform pyeloplasty at your discretion: either by repeating the technique learned in previous scenarios with instructions, or by using another technique known to you.
Instruments
List of instruments recommended for this scenario. You may use alternative instruments with equivalent functionality, including those sideloaded from an AssetBundle, as long as they support the same actions.
- robotic_grasper_5mm
- robotic_scissors_5mm